Lesson 1 - First steps
Here we look at the setup of the basic VPython interface within glowscript.org, and creaate a basic program to demonstrate functionality of the output window.
Timings
Teaching: 40 min
Exercises: 20 min
Objectives
By the end of the lesson the student should be able to:.
Log into the glowscript.org website and create a basic program to show an object.
Have an understanding of 3-D space and how vectors are used to change VPython object attribute properties.
Have an understanding of the basic syntax of VPython code and to make decisions based on data in a variable.
When errors occur, be able to interpret the error and correct the code.
Getting started
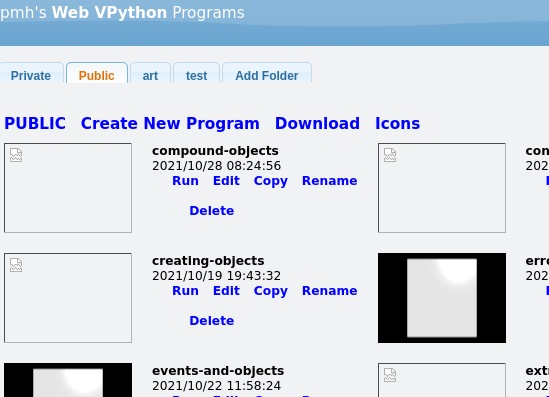
Once you have logged in to glowscript.org and created your username, click the link to your programs.
They can also be accessed by clicking on your username on the top right of the page.
The web page shows your folders in tabs along the top and files within the main page body.
The 'Icons' link toggles between the 'Icon' view (default) and the 'List' view. Click to suit your needs, the functionality of this will become obvious when you've created some programs.
The 'PRIVATE' link toggles your programs between private and publicly available.
Alternatively, you can copy private programmes to public using the ‘copy’ or ‘rename’ link and placing the word ‘Public’ in front of the program name (note the capital ’P’ in Public).
You will then be able to share this link with others to see your work.
Clicking the link 'Create New Program' will open a blank edit page will open with a header line that says something like 'Web VPython 3.2'.
Always start typing your program on the second line. Erasing the 'Web VPython 3.2' header will prevent your program from working.
Click 'Run this program' to try out your program, the output window will then show (but it will be blank if you haven't typed anything). You can return to the coding window by clicking on 'Edit this program'.
The VPython Interface
The Graphics window
When using VPython the graphics window (also called canvas), shows objects in 3D space.
The center of the canvas is at the location (0,0,0) in (x,y,z) dimensions. The +x axis runs to the right, the +y axis runs up, and the +z axis points out of the screen, toward you.
Figure 1 shows the 3D axis viewed at about 45 degrees.
x, y, and z are measured in whatever units you choose; the canvas is automatically scaled appropriately.
The Output Window
The output window is the space below the graphics window.
In Figure 1 it is eveything below the grey area containing the objects.
The output of any -print- statements you execute in your program goes to a scrolling text window underneath the graphics window.
You can use this window to print values of variables, lists, messages, etc.
The Code Window
This is the area where you type your program code. In order to be able to create a graphics window, the code needs to contain at least one object to be visible.
Viewing the Scene
In the canvas, you can navigate around by clicking and dragging with the right mouse button (or hold down the Ctrl key while dragging).
Drag left or right and you rotate around the scene. To rotate around a horizontal axis, drag up or down.
Click and drag up or down with the middle mouse button to move closer to the scene or further away.
On a 2-button mouse, hold down the left and right buttons and drag, on a 1-button mouse, hold down the Alt key, on a touch pad, use 2 fingers. To pan left/right and up/down, drag with the shift key held down.
The user view of the scene can also be altered with code which we will explore later in the course.
Terminology
Below are some common programming terms which will often be referred to throughout the course:
Object: A collection of data which represents something like a shape on the screen and is created by a Constructor such as box().
Attribute: A property of an object which holds a value. For example box.color: color is an attribute of the box object.
Variable: A user defined data type which can hold the results of functions or preset value. For example mybox=box(): here mybox is a user defined variable which allows the user to control the object box(). Note: if the user does not associate an object with a variable then the user will not have control over the object.
Function: a routine which performs an operation on data and can return a result.
Method: An internal function contained within an object which can alter values of the object.
Vector: A set of three values which together can define an objects position in 3D space or a colour.
Objects
Simply put, an object in VPython is a 'thing' with a particular set of properties. The graphical objects you create, such as spheres, boxes and curves, continue to exist for the duration of your program, and the VPython 3D graphics module will continue to display them, wherever they are. You must give each object a name (such as mybox in the following example) if you wish to refer to it again later in your program.
Example of the simplest program, in which we create a shape with the constructor box() and assign it the variable name mybox, shown in Figure 2:
mybox=box()
Exercise 1
Create your first program! Using the example above, write a program that shows a simple white box when you run it. Get familiar with the code window and the graphics window. Use the mouse buttons to rotate and zoom to geet a feel for the 3D space.
Attributes
Attributes are elements of an object that help define it. For example, spheres have the attribute of radius, which defines how big or small they are. All objects have attributes such as colour, size and position.
You can either set the values of attributes in the constructor when you create the object, such as this:
myobject=object(attribute=value)
Alternatively you can modify attributes of an object after you've created it, like this:
myobject=object()
myobject.attribute=value
All objects have default attributes. In Figure 2 we have a white box in the center of the screen at position (0,0,0) and its size is 1 unit on all sides. This is because we create the box without specifying any attributes in the constructor box() so VPython assigns it a default position (centered within the scene), size (1 unit length) and colour (white).
Colours
To change the colour of an object we need to change the color attribute.
Note: All colour references in VPython use the American spelling 'color' and not the British 'colour'!
VPython comes with some predefined common colours for easy reference, which you can find a list of in the glossary.
To use the predefined colours we access them by using the color object and the predefined colour name attribute. For example, the colour red can be assigned with color=color.red
In the example above, we can colour our myobject red in two ways, by either creating an object with a red colour attribute like this:
myobject=object(color=color.red)
Or by creating the object with default attributes and then changing the colour after, like this:
myobject=object()
myobject.color=color.red
Colours can also be defined by using a vector object to represent the colour, which specifies the levels of red, green and blue and hence allows the creation custom colours.
A colour vector is created using the statement vector(R,G,B) where R=Red, G=Green and B=Blue, with values between 0 and 1, according to the normalised RGB colour model.
(If you're interested you can learn more about RGB here.)
So for primary red we use vector(1,0,0), which is 100% red, with no green or blue. For a darker red we would use a fraction of 1 such as vector(0.5,0,0).
To create yellow we would mix in green: vector(1,1,0). For white we use all three colours at full strength: vector(1,1,1). For black we use no colours: vector(0,0,0).
Exercise 2
1. Colour your white mybox from the previous exercise red. Try this with both methods, by creating a red box and by creating a box and colouring it red after, using the example code above.
2. Can you modify the program to see the same red using the vector notation of the colour red?
3. Using what you have learned, modify the program to create a box which is a dark purple
Hint: Purple is a mixture of red and blue.
Solution to Exercise 2
1. A red box can be created in 2 ways:
mybox=box(color=color.red)
or
mybox=box()
mybox.color=color.red
2. Using colour vector notation:
mybox=box(color=vector(1,0,0))
or
mybox=box()
mybox.color=vector(1,0,0)
3. A purple box:
mybox.color=vector(0.2,0,0.2)
The exact values of R and B do not matter here, the important thing to understand is the lower the number, the darker the colour.
Size and Position
The size of an object in VPython is denoted by a 3D vector containing values for width, height and depth of the object.
In the last exercise you created a box with a default size, which is the unit vector(1,1,1).
If you create a box the attribute size=vector(1000,1000,1000) for example, it will look exactly the same on your screen as the graphics window automatically scales to fit the objects in the scene.
Let us create another box in our program with a different size and colour:
Note: Code in grey boxes can be simply copied and pasted into your code window.
mybox=box(color=color.red, size=vector(1,1,1))
mylittlebox=box(color=color.green, size=vector(0.5,0.5,0.5))
Run the program. Where is the green box??
Because the default position of objects is the center of the screen (0,0,0) and the green box is half the size of the red one, it is actually inside the red box!
To prove this let us move the position of the green box with the position attribute 'pos'.
Modify your program so that it reads as follows:
mybox=box(color=color.red, size=vector(1,1,1))
mylittlebox=box(color=color.green, size=vector(0.5,0.5,0.5), pos=vector(2,0,0))
Run the program to see the effect.
Here we have moved the center of the green box 2 units in the positive x direction, i.e. to the right.
Note:'pos' is short for position.
Not all objects have width, height and depth, for example a sphere, which only needs a radius to define its size.
In VPython a sphere is created using the constructor sphere(). Let us add one on top of the red box in the above program:
mybox=box(color=color.red, size=vector(1,1,1))
mylittlebox=box(color=color.green, size=vector(0.5,0.5,0.5), pos=vector(2,0,0))
myball=sphere(color=color.cyan,radius=0.5, pos=vector(0,1,0))
As we know the size of the box in the y dimenstion, we can use that number in the y component of the position vector of the sphere to put it on top of the box.
Exercise 3
Using the program above, move the sphere between the red box and the green box and change the shape of the green box to a rectangular box in the z direction with length 2.
Solution
mybox=box(color=color.red, size=vector(1,1,1))
mylittlebox=box(color=color.green, size=vector(0.5,0.5,2), pos=vector(2,0,0))
myball=sphere(color=color.cyan,radius=0.5, pos=vector(1,0,0))
Errors
When coding, we all make mistakes. There are two types: syntax errors and programmatic errors.
Syntax errors are spelling and punctuation errors or incorrect labels for example. If you make a syntax mistake, such as spere(radius=12), VPython will tell you this with an error message and try to indicate the line where the error occurred.
This not always the case and sometimes the error lies above the indicated error line.
Programatic errors are harder to find. For example, objects could be rotating the wrong way or their position is out and you will need to interrogate the program to find your mistake. One way of doing this is by asking your program to print out values of the variables by using the print() statement. The results are displayed in a box below the main output window.
Exercise 4
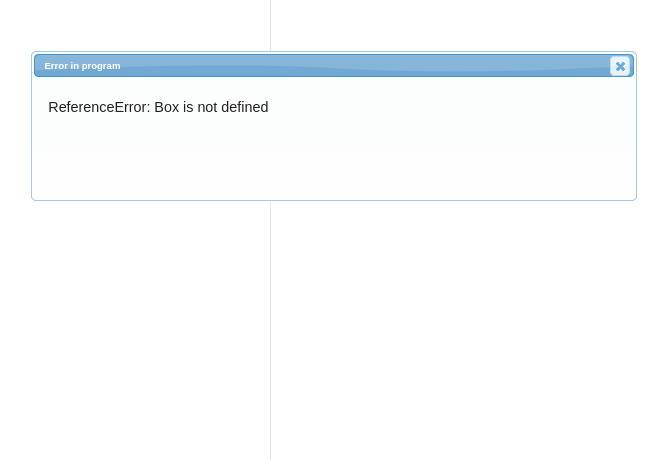
Copy and paste the following code into your program editor:
Box(color=color.red)
Run this program you will see a canvas containing an error box.Read the error and see how it relates to the program. Can you see how to fix it?
Solution
The error will look like this:
Error: ReferenceError: Box is not defined:
At or near line X: Box(color=color.red)
where X is the line number with the offending statement.
VPython is case sensitive and it does not recognise 'Box'. Changing the code to 'box' will cure the error.
Printing Results
To print a number, a vector, a list, or anything else, use the print() statement:
print(mybox.size)
To print a text message, enclose it in quotes:
print("My green box is", mybox.size.z, "long.")
This could also be done like this (note the initial f that makes this work):
print(f"My green box is {mybox.size.z} long.")
Exercise 5
Copy and paste the codes above into your program to see how the print statements work. Note that the output for mybox.size is in the form of a vector.
Programming techniques
When learning coding, there are a few basic techniques for avoiding errors and keeping track of things:
- Use plenty of comments in the code by using a # or triple quotes '''...''' to describe a variable or section of code
- Choose sensible variable names that describe roughly what they do: this makes them easier to locate in the editor.
- When developing a program, try to avoid writing over code: instead 'comment out' the section with a # or quotes. When it all works you can always remove them.
- Give vectors a name like 'center=vector(0,0,0)' or 'mycolor=vector(0.4,0.6,1.0)'. This is particularly useful for positional vectors and helps to separate them.
- Change small sections of code at a time, then save and test. This way you can build up the complexity of the code slowly.
- Print out troublesome object values using the print() statement.
- Typos are very common and annoying. Where possible, copy and paste sections of code to avoid mistakes.
- Keep at it! Errors and debugging are normal and not to be feared: understanding and fixing them makes you a better programmer.
Conclusion
This concludes the introduction to VPython.
You now should now be able to:
Create simple shapes in the graphical output screen.
Understand the 3-D space in VPython and move around the scene with the mouse.
Have a basic understanding of objects and their attributes as well as colours.
Be familiar with the error box in VPython and understand what it means to help debug code.
Use the print() statement to output the values of variables to the screen.